 testomat.io управление авто тестами
Доброго времени суток, помогите пожалуйста запустить WebdriverIO + Appium + MacOS с любым тестовым приложением к примеру app: “http://appium.s3.amazonaws.com/TestApp7.1.app.zip”. У меня элементарно не получается даже запустить через конфигурационный файл, вроде все делаю как описано в http://webdriver.io/guide/services/appium.html#description , по какой-то причине все равно запускается Firefox и просто весит с бесконечным лоудером, эмулятором даже и не пахнет, хотя все указано верно. Буду очень признателен за помощь, бодаюсь уже 4 день…
вместо мобильного теста запускается FF ? Ви уверени что инстанс драйвера создаете правильний ?
exports.config = {
//
// ==================
// Specify Test Files
// ==================
// Define which test specs should run. The pattern is relative to the directory
// from which `wdio` was called. Notice that, if you are calling `wdio` from an
// NPM script (see https://docs.npmjs.com/cli/run-script) then the current working
// directory is where your package.json resides, so `wdio` will be called from there.
//
specs: [
    './test/specs/**/*.js'
],
// Patterns to exclude.
exclude: [
    // 'path/to/excluded/files'
],
//
// ============
// Capabilities
// ============
// Define your capabilities here. WebdriverIO can run multiple capabilities at the same
// time. Depending on the number of capabilities, WebdriverIO launches several test
// sessions. Within your capabilities you can overwrite the spec and exclude options in
// order to group specific specs to a specific capability.
//
// First, you can define how many instances should be started at the same time. Let's
// say you have 3 different capabilities (Chrome, Firefox, and Safari) and you have
// set maxInstances to 1; wdio will spawn 3 processes. Therefore, if you have 10 spec
// files and you set maxInstances to 10, all spec files will get tested at the same time
// and 30 processes will get spawned. The property handles how many capabilities
// from the same test should run tests.
//
maxInstances: 10,
//
// If you have trouble getting all important capabilities together, check out the
// Sauce Labs platform configurator - a great tool to configure your capabilities:
// https://docs.saucelabs.com/reference/platforms-configurator
//
capabilities: [{
    // maxInstances can get overwritten per capability. So if you have an in-house Selenium
    // grid with only 5 firefox instances available you can make sure that not more than
    // 5 instances get started at a time.
    maxInstances: 5,
    //
    browserName: 'firefox'
}],
//
// ===================
// Test Configurations
// ===================
// Define all options that are relevant for the WebdriverIO instance here
//
// By default WebdriverIO commands are executed in a synchronous way using
// the wdio-sync package. If you still want to run your tests in an async way
// e.g. using promises you can set the sync option to false.
sync: true,
//
// Level of logging verbosity: silent | verbose | command | data | result | error
logLevel: 'silent',
//
// Enables colors for log output.
coloredLogs: true,
//
// If you only want to run your tests until a specific amount of tests have failed use
// bail (default is 0 - don't bail, run all tests).
bail: 0,
//
// Saves a screenshot to a given path if a command fails.
screenshotPath: './errorShots/',
//
// Set a base URL in order to shorten url command calls. If your url parameter starts
// with "/", then the base url gets prepended.
baseUrl: 'http://localhost',
//
// Default timeout for all waitFor* commands.
waitforTimeout: 10000,
//
// Default timeout in milliseconds for request
// if Selenium Grid doesn't send response
connectionRetryTimeout: 90000,
//
// Default request retries count
connectionRetryCount: 3,
//
// Initialize the browser instance with a WebdriverIO plugin. The object should have the
// plugin name as key and the desired plugin options as properties. Make sure you have
// the plugin installed before running any tests. The following plugins are currently
// available:
// WebdriverCSS: https://github.com/webdriverio/webdrivercss
// WebdriverRTC: https://github.com/webdriverio/webdriverrtc
// Browserevent: https://github.com/webdriverio/browserevent
// plugins: {
//     webdrivercss: {
//         screenshotRoot: 'my-shots',
//         failedComparisonsRoot: 'diffs',
//         misMatchTolerance: 0.05,
//         screenWidth: [320,480,640,1024]
//     },
//     webdriverrtc: {},
//     browserevent: {}
// },
//
// Test runner services
// Services take over a specific job you don't want to take care of. They enhance
// your test setup with almost no effort. Unlike plugins, they don't add new
// commands. Instead, they hook themselves up into the test process.
services: ['appium'],

appium: {
    args: {
        address: '127.0.0.1',
        commandTimeout: '7200',
        sessionOverride: true,
        debugLogSpacing: true,
        platformVersion: '10.3',
        platformName: 'iOS',
        showIosLog: true,
        deviceName: 'iPhone 6',
        nativeInstrumentsLib: true,
        isolateSimDevice: true,
        app: 'http://appium.s3.amazonaws.com/TestApp7.1.app.zip'
    }
},
//
// Framework you want to run your specs with.
// The following are supported: Mocha, Jasmine, and Cucumber
// see also: http://webdriver.io/guide/testrunner/frameworks.html
//
// Make sure you have the wdio adapter package for the specific framework installed
// before running any tests.
framework: 'mocha',
//
// Test reporter for stdout.
// The only one supported by default is 'dot'
// see also: http://webdriver.io/guide/testrunner/reporters.html
reporters: ['dot'],

//
// Options to be passed to Mocha.
// See the full list at http://mochajs.org/
mochaOpts: {
    ui: 'bdd'
},
//
// =====
// Hooks
// =====
// WebdriverIO provides several hooks you can use to interfere with the test process in order to enhance
// it and to build services around it. You can either apply a single function or an array of
// methods to it. If one of them returns with a promise, WebdriverIO will wait until that promise got
// resolved to continue.
//
// Gets executed once before all workers get launched.
// onPrepare: function (config, capabilities) {
// },
//
// Gets executed just before initialising the webdriver session and test framework. It allows you
// to manipulate configurations depending on the capability or spec.
// beforeSession: function (config, capabilities, specs) {
// },
//
// Gets executed before test execution begins. At this point you can access all global
// variables, such as `browser`. It is the perfect place to define custom commands.
// before: function (capabilities, specs) {
// },
//
// Hook that gets executed before the suite starts
// beforeSuite: function (suite) {
// },
//
// Hook that gets executed _before_ a hook within the suite starts (e.g. runs before calling
// beforeEach in Mocha)
// beforeHook: function () {
// },
//
// Hook that gets executed _after_ a hook within the suite starts (e.g. runs after calling
// afterEach in Mocha)
// afterHook: function () {
// },
//
// Function to be executed before a test (in Mocha/Jasmine) or a step (in Cucumber) starts.
// beforeTest: function (test) {
// },
//
// Runs before a WebdriverIO command gets executed.
// beforeCommand: function (commandName, args) {
// },
//
// Runs after a WebdriverIO command gets executed
// afterCommand: function (commandName, args, result, error) {
// },
//
// Function to be executed after a test (in Mocha/Jasmine) or a step (in Cucumber) starts.
// afterTest: function (test) {
// },
//
// Hook that gets executed after the suite has ended
// afterSuite: function (suite) {
// },
//
// Gets executed after all tests are done. You still have access to all global variables from
// the test.
// after: function (result, capabilities, specs) {
// },
//
// Gets executed right after terminating the webdriver session.
// afterSession: function (config, capabilities, specs) {
// },
//
// Gets executed after all workers got shut down and the process is about to exit. It is not
// possible to defer the end of the process using a promise.
// onComplete: function(exitCode) {
// }
}
Вы пробовали этот пример из официального репозитория webdriverio/examples/appium at main · webdriverio/webdriverio · GitHub ?
1 лайк
Да, пробовал. Возможно у меня неверные шаги, опишу пошагово свои действия:
1.Запускаю через терминал selenium stand alone server из папки проекта: java -jar -Dwebdriver.gecko.driver=./geckodriver selenium-server-standalone-3.3.1.jar
2.Запускаю через новый терминал webdriverIO из папки проекта: ./node_modules/.bin/wdio wdio.conf.js
wdio.conf.js - содержит все то что я скидывал ранее.
test.js содержит следующий код: https://github.com/webdriverio/webdriverio/blob/master/examples/appium/appium-draws-its-logo.js
После всего содеянного, запускается firefox, что-то пытается загрузить и после закрывается. В консоли следующее:
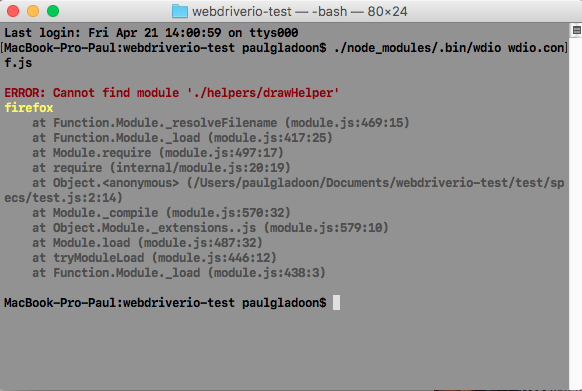
Возникает вопрос, почему вообще запускается firefox, а не эмулятор iOS.
ERROR: Cannot find module './helpers/drawHelper'
А вас эта ошибка не смущает? У вас неправильный require на строке test.js:2:14
и попробуйте убрать капабилити на десктоп файрфокс браузер,
capabilities: [{
    // maxInstances can get overwritten per capability. So if you have an in-house Selenium
    // grid with only 5 firefox instances available you can make sure that not more than
    // 5 instances get started at a time.
    maxInstances: 5,
    //
    browserName: 'firefox'
}],
1 лайк
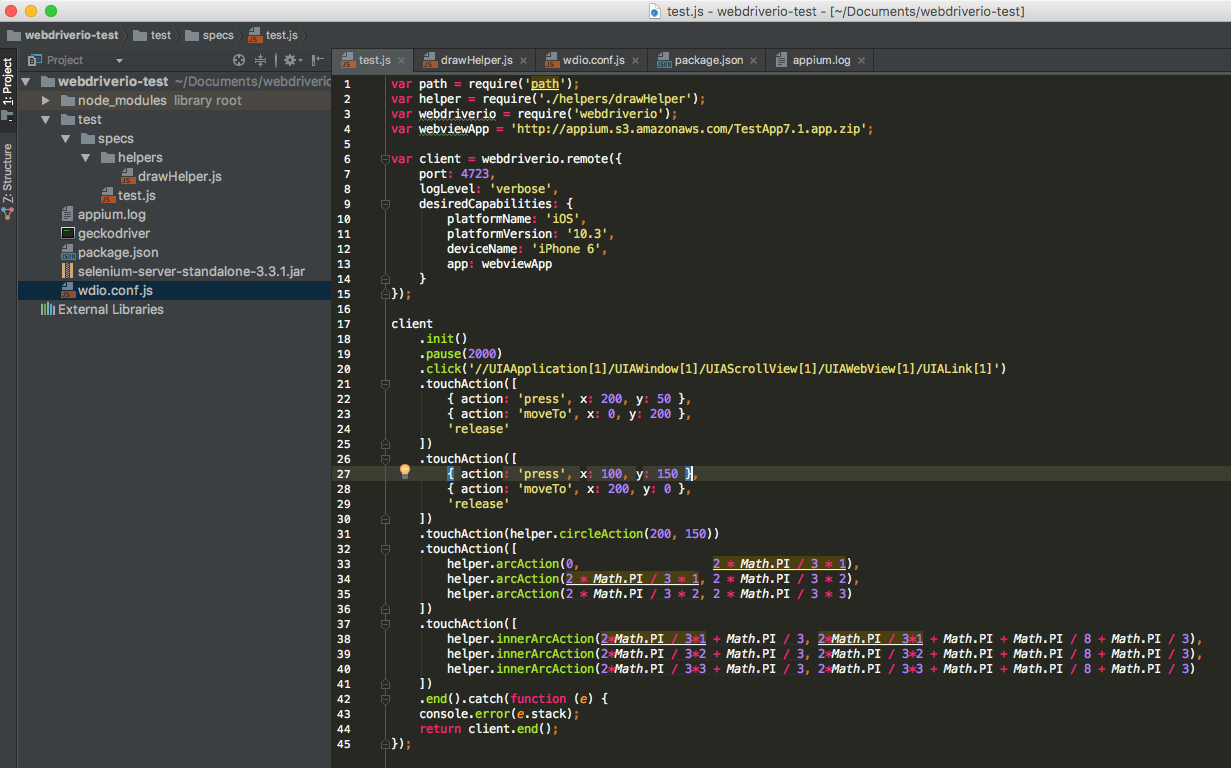
Тут всё проще, вам не надо запускать wdio.conf.js для этого примера, просто запускайте node appium-draws-its-logo.js. Только скачайте и поправьте в этом файле пути к модулям:
var webdriverio = require('wevdriverio');
var webviewApp = // path to your app
А firefox запускаеся потому что он указан в конфиг файле.
1 лайк
Вы говорите запускать в режиме “Standalone Mode” но зачем? Теперь мы должны явно клеить все команды одну к другой по цепочке.
Достаточно просто разобратся с конфигом wdio.conf.js
Standalone Mode очень неудобный. Если не планируется городить свой раннер для webdriverio то проще заюзать уже готовый, и пользоватся всеми преимуществами блокирующего выполнения команд.
Different than using the standalone mode all commands that get executed by the wdio test runner are synchronous. That means that you don’t use promises anymore to handle async code.
Больше про разные режимы -
http://webdriver.io/guide/getstarted/modes.html
1 лайк
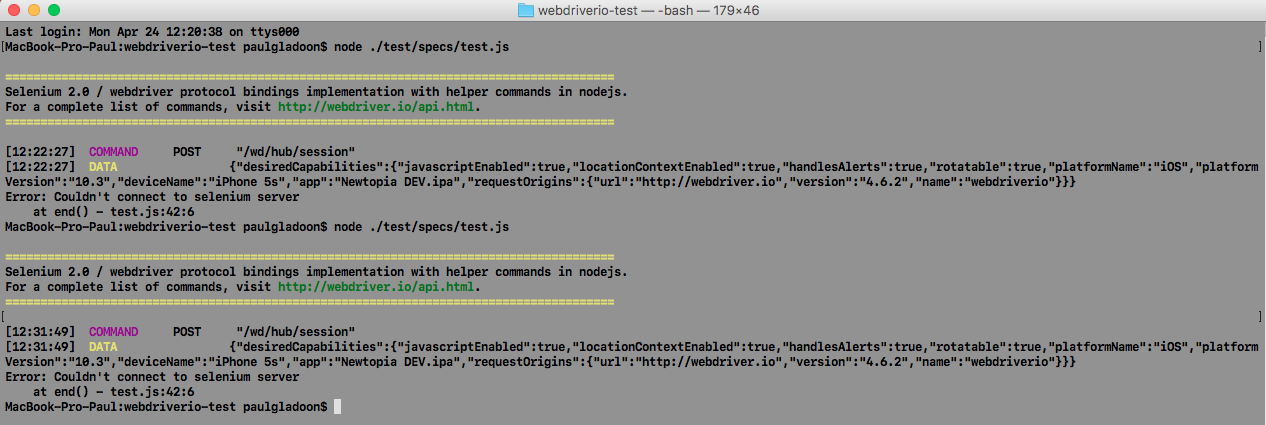
Выполнил все указанные действия, запустил напрямую тестовый файл через node, вывод в консоли:
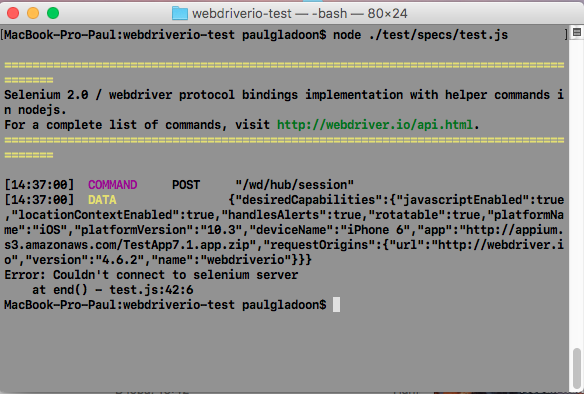
Тестовый файл содержит:
Так а сам appium сервер запустить не пробовали? в консоле appium
1 лайк
Читайте сообщения об ошибках - Error: Couldn't connect to selenium server вас должно натолкнуть на мысль что ваш аппиум сервер или не запущен или недоступен
3 лайка
Ребята, благодарю за вашу помощь, вроде как все запустилось, сейчас еще покурчу с тестами, ОГРОМНОЕ спасибо !
1 лайк
ставим лайки, принимаем как ответ. Я на ачивку собираю )
1 лайк
А чем лучше инспектировать элементы приложения в случаи с iOS и Andorid? Так же возможно существует специальный инспектор для react-native приложений?
Задайте отдельный вопрос. И кстати уже по моему был ответ где-то здесь
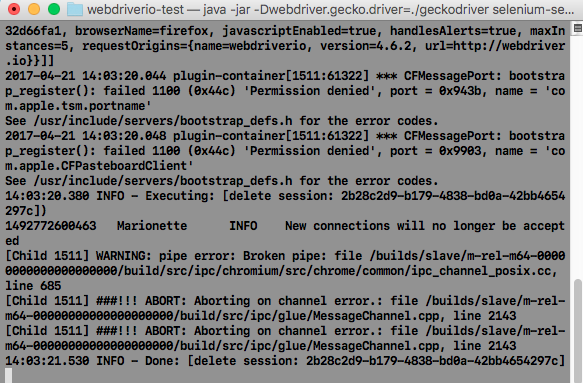
Всем доброго времени суток, проблема заключается в следующем: пытаюсь запустить свое приложение для тестирования на симуляторе iOS. Запускаю appium, запускаю файл с тестами, симулятор запускается, приложение инсталируется, запускается WebDriver на симуляторе, после запускается приложение но через секунду просто сворачивается и симулятор остается на home page, через минут 5 в консоль падает следующее. Вывод в консолях:
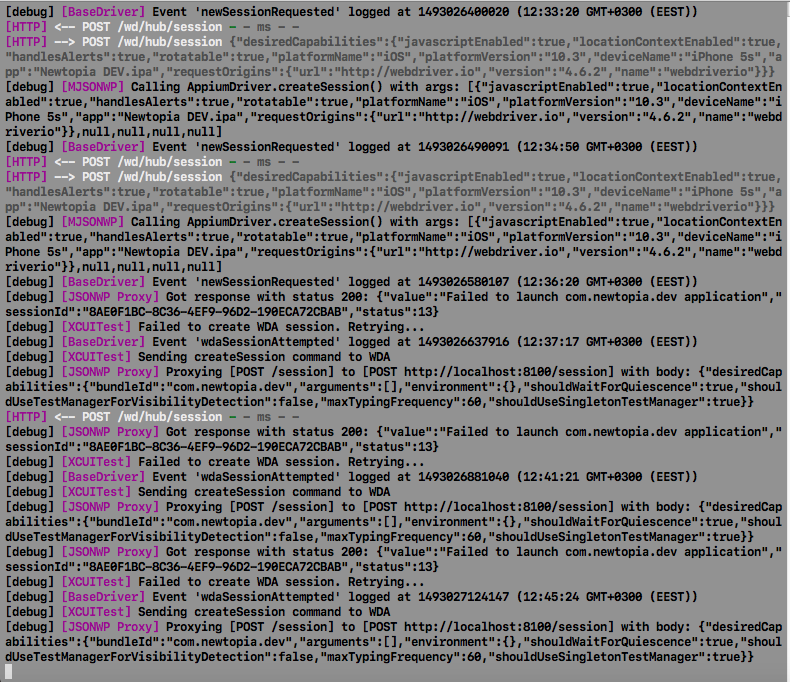
Если не закрывать консоли, на симуляторе переодически возникают попытки запуска приложения, но опять же запускается тестируемое приложение и закрывается через секунду после запуска.
- Возможно, что проблема с вашим тестовым приложением, чтобы Appium мог видеть ваше IOS приложение оно должно быть подписано сертификатом разработчика.
- Также проверьте через appium-doctor возможно что-то криво устаовлено.
- Для тестирования на реальных ios девайсах нужно ещё запускать ios-debug-proxy + еще нужно на девайсе включить “Enable UI automation”
- Также возможно для симулятора нужно сбилдить отдельное приложение, поспрашивайте у своих разработчиков как они запускают.
По ошибкам не очень то понятно в чем причина, там вообще ругается что не может подключится к selenium server’y
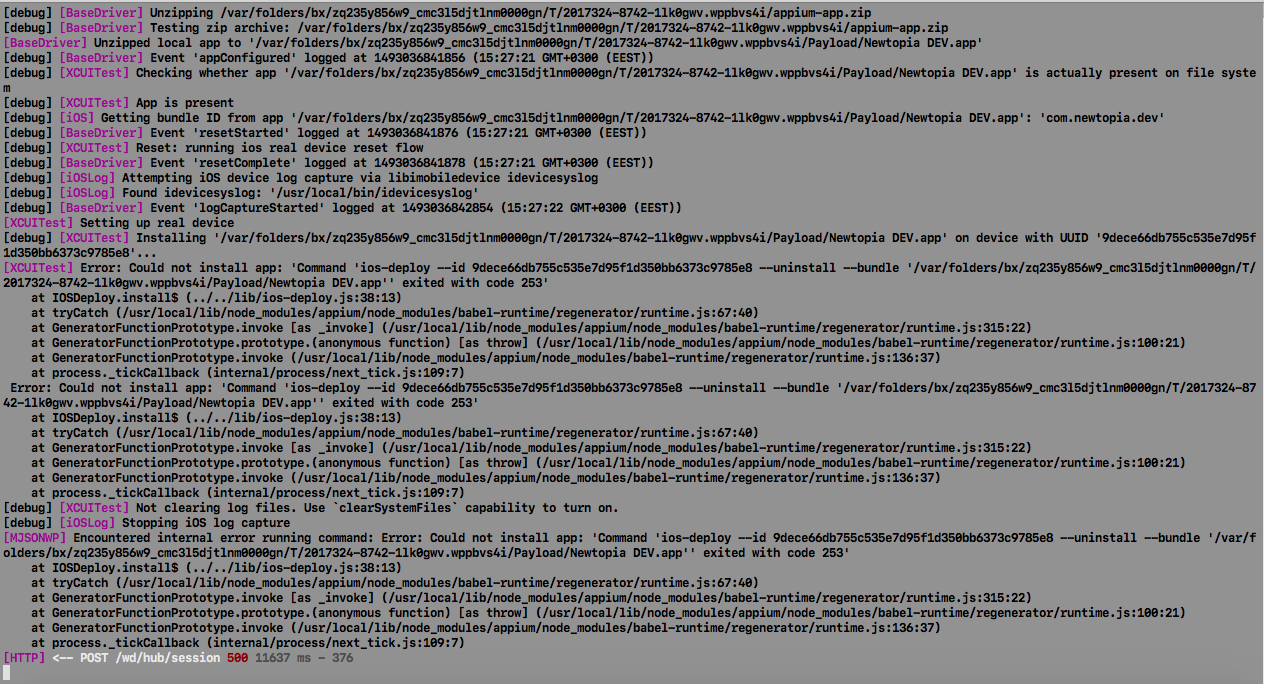
Нашел решение проблемы, билд приложения был собран не под тестирование на симуляторе и реальном девайсе. Возможно у кого-то будет подобная ситуация, как правильно собрать билд: Xcodebuild Destination Cheatsheet | mokacoding . Еще раз хочу поблагодарить всех кто помог прийти к правильному решению.
1 лайк